Install
The User Management Tool (UMT) stores account provisioning rules with your account information in the Citrix cloud. You can install the tool on any machine and access your rules by logging in to your Citrix account.
The account information needed to log on to the User Management Tool is saved on your local machine in the configuration file for each job and secured with DPAPI encryption. When you open the User Management Tool, your ShareFile/Citrix Content Collaboration account URL and user name are pre-filled and you must enter your password.
Verify that your environment meets the system requirements before installing the tool.
If you encounter an error referencing Try enabling AD Diagnostic Logging or Try running UMT elevated:
-
Run the UMT tool as an administrator by right-clicking the UMT program icon and selecting Run As…Administrator, or editing the shortcut properties to always Run as Admin within the Advanced tab.
-
When working with scheduled tasks, select Run with highest privileges when creating a task.
First steps
-
In Active Directory (AD), create a test group containing a few users that already have ShareFile/Citrix Content Collaboration employee accounts. If that is not possible, identify an AD Organizational Unit (OU) that you can use for testing.
-
From Citrix Downloads, download the User Management Tool installer to a server that is in the AD domain. If you do not plan to schedule synchronization, you can install the tool on a workstation instead.
-
Run the installer, following the prompts to complete the installation. A shortcut for the tool is placed on the Start menu and your desktop.
-
Start the User Management Tool. The User Management Tool sign in page appears.
-
Enter the ShareFile/Citrix Content Collaboration account information and then select Log on. The account URL is your ShareFile account URL, in the form
https://mysubdomain.sharefile.comor, in Europe,https://mysubdomain.sharefile.eu. -
Specify an email address that is associated with an administrative or service user on the ShareFile/Citrix Content Collaboration account. The User Management Tool window appears.
-
Connect to the AD domain to be used to create users and distribution groups in ShareFile/Citrix Content Collaboration.
-
Specify an AD user account that has full read permission on the AD domain.
Note:
When you upgrade from a version of the User Management Tool that is earlier than release 1.5, existing rules are moved to the Citrix cloud.
Proxy
If you need to configure a proxy server, select the Options icon and then select Configure Proxy. For best performance, install .NET Framework on a domain-joined machine or VM.
Users on the following machines must manually enable .NET 3.5 to run the ShareFileProxyConfig.exe file.
- Windows Server 2012 R2
- Windows 8 or later
Information on manually enabling .NET 3.5 can be found at this Microsoft article.
Next steps
-
Based on the test group or OU that you identified, select either the Groups tab or the Users tab, select the test group or OU, and then select Add Rule.
-
Select the Rules tab and then select Refresh. The changes that occur when the rules are run appear in the Actions area. If no changes are listed, the rules you applied did not result in new or changed user accounts or groups.
-
Schedule the AD synchronization by selecting Schedule and then use the Save Job dialog box to create a named job and specify a synchronization schedule.
-
After the scheduled synchronization, sign in to the ShareFile/Citrix Content Collaboration interface and verify that the accounts are created.
If you clicked the Groups tab: In the Edit Groups Rule dialog box, select the check boxes for Create a ShareFile distribution group… and Update the ShareFile distribution group… to create and update new employee accounts and distribution groups. If the AD group includes users that do not have accounts, you have the option to create the employee accounts too. Review and update the user options that appear. The options apply to each user created.
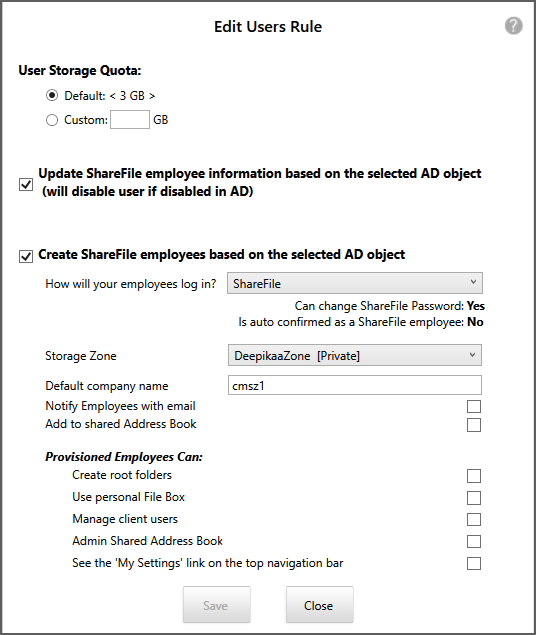
If you clicked the Users tab: In the Edit Users Rule dialog box, review and update the options as needed. The options apply to each user created.
Note:
To create a job that uses advanced configuration such as triggers, actions, or conditions, specify a Schedule of Manual and then use the Windows Task Scheduler.